|
|
|
||||||||||||||||||||||||


Adventures of Galthen Quest
|
|
||||||||||||||||||||||||
Recompensa:    Ancient Aucar Outfits, Royal Bounacean Advisor Outfits, Addons, possibilidade de enfrentar bosses diários, Galthen's Satchel, Artefact Box, acesso à Bounacean Lion, Forest of Life e Iksupan, possibilidade de criar uma Megasylvan Plant, The Living Idol of Tukh, habilidade de negociar com John The Carpenter, Achievements e Título. |
||||||||||||||||||||||||
| Localização: Bounac, Bounacean Lion, Deathling Menace, Edron, Forest of Life, Iksupan, Port Hope e Roshamuul. |
||||||||||||||||||||||||
| Você enfrentará: Carnisylvan Saplings, Crypt Warriors, Cursed Apes, Dark Carnisylvans, Execowtioners, Hulking Carnisylvans, Iks Ahpututus, Iks Aucars, Iks Chukas, Iks Pututus, Iks Yapunac, Minotaur Amazons, Minotaur Hunters, Mitmah Seers, Mitmah Scouts, Mooh'Tah Warriors, Moohtants, Poisonous Carnisylvans, Worm Priestesss. |
||||||||||||||||||||||||
| Mini-Bosses: Nenhum. |
||||||||||||||||||||||||
| Bosses: Ahau, Atab, Megasylvan Yselda, Mitmah Vanguard. |
||||||||||||||||||||||||
| Adicionado: Versão 12.70 (12 de julho de 2021) |
||||||||||||||||||||||||
| Expansões: 13.10 (28 de novembro de 2022) | 13.30.14423 (04 de dezembro de 2023) |
||||||||||||||||||||||||
|
||||||||||||||||||||||||
|
||||||||||||||||||||||||

Veja também: Quests.
Requerimentos
- Suprimentos
Missão: Galthen and the Lost Queen
- Ter completado a The Order of the Lion Quest.
- 02 Human Teeth
 .
. - 10 Carnisylvan Barks
 .
. - 20 Carnisylvan Fingers
 .
.
Missão: Galthen and the City of Gold
Método
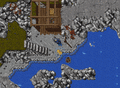
Para iniciar esta quest você precisará ir até Bounac, vá para a cidade de Edron e atravesse as montanhas ao norte para chegar até (aqui![]() ). Você verá um pequeno barco. Basta dar "Use" nele e você será transportado para a área externa de Bounac (aqui
). Você verá um pequeno barco. Basta dar "Use" nele e você será transportado para a área externa de Bounac (aqui![]() ).
).
 Galthen and the Lost Queen I
| Nota: Esta missão deverá ser iniciada durante o dia no horário do jogo, você pode ver o tempo do Tibia ao lado do seu minimap. |
Sua primeira tarefa é se encontrar com Kesar The Younger, durante o dia no jogo (xx:15 até xx:45 no mundo real). Vá até o castelo de Bounac, (aqui![]() ). Diga Hi - Yselda - Mission. Kesar irá te contar sobre sua amada esposa Yselda que desapareceu misteriosamente e menciona que o vidente Lesh The Seer mostrou-lhe visões perturbadoras. Agora caberá a nós a investigação sobre o que aconteceu com ela.
). Diga Hi - Yselda - Mission. Kesar irá te contar sobre sua amada esposa Yselda que desapareceu misteriosamente e menciona que o vidente Lesh The Seer mostrou-lhe visões perturbadoras. Agora caberá a nós a investigação sobre o que aconteceu com ela.
Falando com Kesar
 |
Jogador: Hi
Kesar The Younger: Hail, what can I do for the hero of Bounac? The siege is finally under control, thanks to you. |
Nosso próximo passo é ir até o NPC Lesh The Seer, ele vive em uma cabana na montanha, (aqui![]() ).
A forma mais segura de chegar à ele é atravessando uma das portas seladas ao norte da ilha, mais especificamente esta (aqui
).
A forma mais segura de chegar à ele é atravessando uma das portas seladas ao norte da ilha, mais especificamente esta (aqui![]() ).
Ao chegar lá, fale Hi - Yselda. O Vidente explica que Kesar pediu a ele que o ajudasse a encontrar Yselda, mas que ele não conseguiu realizar a tarefa. Ele também afirma que ela está viva, porém, presa em algum lugar maligno. Ele ainda conta que gerações atrás, o cavaleiro Galthen também estava em busca de respostas para este mesmo problema e que deixou Bounac para procurar respostas em Edron.
).
Ao chegar lá, fale Hi - Yselda. O Vidente explica que Kesar pediu a ele que o ajudasse a encontrar Yselda, mas que ele não conseguiu realizar a tarefa. Ele também afirma que ela está viva, porém, presa em algum lugar maligno. Ele ainda conta que gerações atrás, o cavaleiro Galthen também estava em busca de respostas para este mesmo problema e que deixou Bounac para procurar respostas em Edron.
Falando com Lesh The Seer
 |
Jogador: Hi
Durante o dia Lesh The Seer: A good day I wish, wanderer. Are you here because of the curse? I know you're here because of it... I know it. But am I right? Durante a noite Lesh The Seer: A horrible night for a curse in Bounac, isn't it? Or aren't you here because of... Kesar? No, I know - it's Yselda occupies your mind. Jogador: Yselda |
Agora, devemos ir até a academia de magia de Edron e subir até o último andar da torre central, onde encontraremos Spectulus, (aqui![]() ). Fale Hi - Yselda - Yes. Ele nos contará que Galthen veio a Edron para estudar criaturas exóticas conhecidas como Carnisylvans e que elas estão associadas a uma maldição biológica que afetou as mulheres de Bounac, forçando-as a fugir para lugares escuros e isolados. Com isto em mente, ele sugere que nós devemos, então, investigar as profundezas de Bounac.
). Fale Hi - Yselda - Yes. Ele nos contará que Galthen veio a Edron para estudar criaturas exóticas conhecidas como Carnisylvans e que elas estão associadas a uma maldição biológica que afetou as mulheres de Bounac, forçando-as a fugir para lugares escuros e isolados. Com isto em mente, ele sugere que nós devemos, então, investigar as profundezas de Bounac.
Falando com Spectulus
 |
Jogador: Hi
Spectulus: Ah hello again Jogador! I still have one or two other missions for you. There are also some tasks someone needs to attend to and I heard rumours in need of investigation. ... |
Death Under Bounac
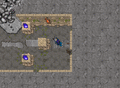
Nosso próximo passo é voltar a Bounac. Ao falar com Spectulus descobrimos que Galthen explorava a ameaça de uma maldição que afetava mulheres e que deveríamos investigar as profundezas da ilha. Para isto, precisamos convencer Kesar The Younger a nos dar acesso aos segredos de seu reino. Começaremos explorando a casa ao sul da ilha aqui (aqui![]() ), lá encontramos o NPC An Idol, dê "Use" no SQM em frente ao NPC para receber a seguinte mensagem:
), lá encontramos o NPC An Idol, dê "Use" no SQM em frente ao NPC para receber a seguinte mensagem:
Staring at the writing you begin to decipher a letter. Then another and another. The symbols seem to wriggle and move: VBOX
Fale Hi - VBOX para o NPC An Idol e você será teleportado para uma área submersa conhecida como Deathling Menace. Ao norte você irá ver muitos Deathling Scouts em um área inacessível, caminhe para o sul até encontrar uma árvore morta e dê "Use" nela, você irá receber: 01 Galthen's Satchel ![]() , dentro dela você encontrará 01 Artefact Box
, dentro dela você encontrará 01 Artefact Box ![]() e as Ancient Notes From The Knight Galthen
e as Ancient Notes From The Knight Galthen ![]() .
.
Falando com An Idol
 |
Jogador: VBOX
An Idol: J-T B^C J^BXT° |
Após alguns segundos, você será teleportado para a praia próxima ao NPC An Idol. Agora devemos ir até Innkeeper Alphonse, ele pode ser encontrado na estalagem da ilha, (aqui![]() ). Diga Hi - Yselda - Yes - Yes - Yes, ele contará que no passado, o knight Galthen esteve em Bounac explorando rituais estranhos e a relação deles com o desaparecimento de mulheres da nobreza.
). Diga Hi - Yselda - Yes - Yes - Yes, ele contará que no passado, o knight Galthen esteve em Bounac explorando rituais estranhos e a relação deles com o desaparecimento de mulheres da nobreza.
Alphonse te entregará algumas notas ![]() escritas por Galthen. Ao dar look nas notas, descobriremos três palavras: DEMIHBOULDR SOMMBHA WITHER, estas palavras serão importantes mais adiante, portanto, anote-as em uma única hotkey.
escritas por Galthen. Ao dar look nas notas, descobriremos três palavras: DEMIHBOULDR SOMMBHA WITHER, estas palavras serão importantes mais adiante, portanto, anote-as em uma única hotkey.
Falando com Innkeeper Alphonse
 |
Jogador: Hi
Innkeeper Alphonse: Welcome, customer! Enjoy a hot meal, fine cheese or a glass of wine! |
Agora devemos retornar até o rei Kesar The Younger e falar Hi - Yselda.
Falando com Kesar The Younger
|
Jogador: Hi
Kesar The Younger: Hail, what can I do for the hero of Bounac? The siege is finally under control, thanks to you. |
Galthen and the Lost Queen II
| Cuidado: A partir daqui você enfrentará criaturas fortes, como Crypt Warriors e as Carnisylvans. |
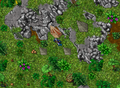
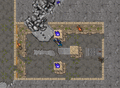
Agora vá em direção a parte sudeste da ilha, passando pelo túnel subterrâneo você encontrará uma porta selada, (aqui![]() ), atravesse-a e desça as escadas para acessar o Bounacean Lion. Caminhe até as escadas (aqui
), atravesse-a e desça as escadas para acessar o Bounacean Lion. Caminhe até as escadas (aqui![]() ) e desça novamente. Ande para a direita, em seguida ao norte e depois para a esquerda até chegar a uma área de Tar (aqui
) e desça novamente. Ande para a direita, em seguida ao norte e depois para a esquerda até chegar a uma área de Tar (aqui![]() ). Você "cairá" em uma área chamada Forest of Life, habitada por todos os tipos de Carnisylvans.
). Você "cairá" em uma área chamada Forest of Life, habitada por todos os tipos de Carnisylvans.
Ao explorar a área das Carnisylvans e descermos para o andar mais profundo encontraremos um caldeirão  (aqui
(aqui![]() ), ao nos aproximarmos dele receberemos a seguinte mensagem:
), ao nos aproximarmos dele receberemos a seguinte mensagem:
A strange creature looks into your eyes. While it is clearly sentient, its mind seems to hide far away from this place.
Nosso próximo passo é coletar os ingredientes para o ritual, TODOS ingredientes são loot das Carnisylvans:
Em posse de todos os itens, use-os um a um no caldeirão. Ao terminar de usá-los, dê USE no caldeirão, você verá a seguinte mensagem:
Excellet. It is done. Now to pour it all over... everything... everyone... yes, just like that.
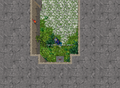
A partir de agora você terá acesso a sala da boss Megasylvan Yselda. Para acessar a sala da alavanca vá até (aqui![]() ) e ande próximo as Carnysilvans petrificadas.
) e ande próximo as Carnysilvans petrificadas.
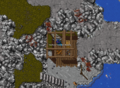
Mensagem após usar todos itens com sucesso

Entrada para a sala da alavanca.


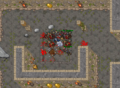
Megasylvan Yselda 
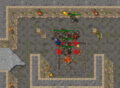
Ao entrar na sala você e seu time, encontrarão a boss Megasylvan Yselda e a NPC Yselda. Note que neste ponto a boss é praticamente imune, dentro da sala iremos encontrar também quatro Megasylvan Saplings ![]() , as quais estão posicionadas uma em cada extremo.
, as quais estão posicionadas uma em cada extremo.
Um dos membros do time, preferencialmente um Knight, deverá se aproximar da boss/npc e dizer as palavras DEMIHBOULDR SOMMBHA WITHER (as mesmas palavras que aprendemos anteriormente na quest), deste modo a NPC Yselda irá responder AAAAAAAAAAAAAH!!! e a partir deste ponto a boss Megasylvan Yselda ficará vulnerável à ataques. Porém, as saplings começarão a tomar dano de aproximadamente 200 a cada turno de ataque. É importante que cada sapling seja curada por um membro do time usando Exura Gran Mas Res ou Ultimate Healing Rune ![]() . E ao mesmo tempo será necessário atacar a Megasylva Yselda até que ela seja derrotada.
. E ao mesmo tempo será necessário atacar a Megasylva Yselda até que ela seja derrotada.
A mecânica de cura das Saplings é necessária pois somente mantendo elas vivas você receberá a Violet Tulip ![]() do NPC Kesar.
do NPC Kesar.
Assim que derrotar a boss fale Hi para Yselda, ela irá lhe agradecer por liberta-la, porém avisa que a ameça das Carnisylvans está apenas começando.
Falando com Yselda
|
Jogador: Hi
Deixando as Megasylvan Sapling morrerem Yselda: You freed me... yet my children had to die. It may have been for the better, brave warrior. All around me, I can see them awake. Brothers, sisters, generations. We will not rest, we cannot be stopped. ... Mantendo as Megasylvan Sapling vivas Yselda: You freed me, brave warrior... and you even saved my... children. ... |
Volte até Kesar para reportar sua missão, a partir de agora você poderá usar um atalho para a superfície de Bounac (ele tem aparência de uma raiz de árvore e ao usá-la você estará próximo ao barco de entrada)  . Fale Hi - Yselda, e caso você tenha matado a Boss sem deixar as quatro Megasylvan Saplings morrerem, Kesar irá lhe agradecer por trazer paz para sua amada e lhe pedirá um último favor. O favor é entregar uma Violet Tulip
 ![]() para Yselda.
para Yselda.
Usando o atalho no térreo (aqui
 ), você sairá (aqui) e vice-versa.

Reportando a missão
|
Jogador: Hi
Kesar The Younger: Hail, what can I do for the hero of Bounac? The siege is finally under control, thanks to you. |
Royal Bounacean Advisor Outfits
Ao reportar sua missão para Kesar, ele irá lhe presentear com o Royal Bounacean Advisor Outfit.
Male/Female:


Galthen and the Lost Queen III
Com a missão de entregar uma Violet Tulip ![]() para Yselda, você e seu time devem enfrentar a boss Megasylvan Yselda mais uma vez, seguindo a mesma mecânica de cura das Megasylvan Saplings da primeira luta. Após derrotar a boss pela segunda vez, fale Hi para Yselda e dê use na Violet Tulip para receber o Achievement.
para Yselda, você e seu time devem enfrentar a boss Megasylvan Yselda mais uma vez, seguindo a mesma mecânica de cura das Megasylvan Saplings da primeira luta. Após derrotar a boss pela segunda vez, fale Hi para Yselda e dê use na Violet Tulip para receber o Achievement.
Falando com Yselda
|
Jogador: Hi
Yselda: You freed me, brave warrior... and you even saved my... children. ... |
Retorne até Kesar e reporte a missão mais uma vez falando Hi - Yselda.
Reportando a missão
|
Jogador: Hi
Kesar The Younger: Hail, what can I do for the hero of Bounac? The siege is finally under control, thanks to you. |
 Galthen and the City of Gold I
Para iniciar está missão, vá para Roshamuul, a única maneira de acessar a ilha é viajando com o Captain Bluebear em Thais, chegando em Roshamuul, encontre o NPC Sandomo em sua barraca (aqui![]() ). Fale Hi - Tiquanda - Yes - Grandfather - Key - Diary, ele vai contar que já esteve em Tiquanda investigando ruínas de uma civilização perdida, que construiu um império de ouro embaixo da terra, mas após tentarem entrar nas ruínas, foram atacados por bestas selvagens e desistiram.
). Fale Hi - Tiquanda - Yes - Grandfather - Key - Diary, ele vai contar que já esteve em Tiquanda investigando ruínas de uma civilização perdida, que construiu um império de ouro embaixo da terra, mas após tentarem entrar nas ruínas, foram atacados por bestas selvagens e desistiram.
_1.png)
_2.png)
Falando com Sandomo
|
Jogador: Hi
Sandomo: Hm. Greetings. |
Sandomo irá te entregar a primeira parte do disco ![]() , que serve de chave para entrar na cidade perdida de Iksupan e uma página de um diário velho que indica as últimas localizações conhecidas das outras duas partes do disco. Uma das partes está em Oramond e a outra em uma das ilhas geladas ao noroeste de Carlin, que só pode ser acessada através de Folda.
, que serve de chave para entrar na cidade perdida de Iksupan e uma página de um diário velho que indica as últimas localizações conhecidas das outras duas partes do disco. Uma das partes está em Oramond e a outra em uma das ilhas geladas ao noroeste de Carlin, que só pode ser acessada através de Folda.
Folda - Nordic Conqueror
Para pegar esta parte do disco, vá para Folda através do NPC Nielson (aqui![]() ) e caminhe até (aqui
) e caminhe até (aqui![]() ), desça as escadas e caminhe um pouco para o norte e em seguida para a direita, ao encontrar uma área com um lago e alguns Frost Trolls, vá para o sul desta área (aqui
), desça as escadas e caminhe um pouco para o norte e em seguida para a direita, ao encontrar uma área com um lago e alguns Frost Trolls, vá para o sul desta área (aqui![]() ) e você verá dois SQMs cinzas com símbolos, use uma Pick ou canivete para abrir uma buraco escondido, desça e você estará em uma tumba congelada, clique no esqueleto em cima do caixão para obter a parte do disco
) e você verá dois SQMs cinzas com símbolos, use uma Pick ou canivete para abrir uma buraco escondido, desça e você estará em uma tumba congelada, clique no esqueleto em cima do caixão para obter a parte do disco ![]() .
.

Desça aqui.

Fragment of an Ancient Disc.


Oramond - Fallen Dragon
Para pegar esta parte do disco, vá para Oramond e não se esqueça de ter 05 Nails ![]() em sua backpack. Saia da cidade pela saída leste em direção ao acampamento de minotauros (aqui
em sua backpack. Saia da cidade pela saída leste em direção ao acampamento de minotauros (aqui![]() ), siga para leste até chegar a uma escada (aqui
), siga para leste até chegar a uma escada (aqui![]() ), suba duas vezes e vá para sudeste e desça dois andares (aqui
), suba duas vezes e vá para sudeste e desça dois andares (aqui![]() ).
).
Dentro da estrutura de madeira no local, você encontrará uma caixa de madeira, dê "Use" nela para obter alguns pedaços de madeira molhada ![]() . Em seguida, com madeira e os pregos em sua backpack, clique nas Wet Boards e uma "jangada" (madeira flutuante) irá aparecer, dê use na bollard (toco de madeira ao lado da jangada) e você irá para uma ilha remota de Oramond aonde só existe o esqueleto de um dragão. Clique no corpo da criatura, especificamente no SQM da coluna vertebral, para obter a parte do disco
. Em seguida, com madeira e os pregos em sua backpack, clique nas Wet Boards e uma "jangada" (madeira flutuante) irá aparecer, dê use na bollard (toco de madeira ao lado da jangada) e você irá para uma ilha remota de Oramond aonde só existe o esqueleto de um dragão. Clique no corpo da criatura, especificamente no SQM da coluna vertebral, para obter a parte do disco ![]() . Para retornar, clique na madeira flutuante ao sul.
. Para retornar, clique na madeira flutuante ao sul.
Wet Boards
Animação Ilustrativa, Wet Boards e Nails devem estar dentro da sua backpack.
Sendo transportado para a ilha remota.

Clique no SQM em destaque para obter a parte do disco.

Part of an Ancient Disc.


Com as três partes em sua backpack, use qualquer uma das partes em outra e você irá obter a Key Intihuatac ![]() . Com a chave completa, vá para Port Hope e saia da cidade em direção ao sul e caminhe até chegar em uma formação rochosa (aqui
. Com a chave completa, vá para Port Hope e saia da cidade em direção ao sul e caminhe até chegar em uma formação rochosa (aqui![]() ), você encontrará uma escritura
), você encontrará uma escritura  que menciona Sandomo, use o disco nela para acessar Iksupan.
| Obs: Toda vez que quiser entrar em Iksupan, você deverár ter a Key Intihuatac |
| Obs: Caso você perca sua Key Intihuatac, é possível refazê-la a cada 24 horas. Basta dizer Hi - Lost ao o NPC Sandomo para receber a primeira parte novamente, e poder coletar as outras partes nos locais indicados. |
Daedal Chisels e Broken Iks Set
Antes de prosseguir para o boss aconselhamos coletar 03 Daedal Chisels ![]() que dropam apenas de Iks Ahpututus. Essa parte de coleta do chisels não é obrigatória, porem irá facilitar no futuro aos level menores a matar o Ahau!!
que dropam apenas de Iks Ahpututus. Essa parte de coleta do chisels não é obrigatória, porem irá facilitar no futuro aos level menores a matar o Ahau!!
Caso escolha por coletar os Daedal Chisel, faça a mecânica de spawnar os Iks Ahpututu que consiste em matar criaturas de Iksupan próximo a fogueiras que se acendem em intervalos de tempo específicos, o melhor local é (aqui![]() ) e (aqui
) e (aqui![]() ) por serem duas fogueiras próximas uma da outra. Conforme você mate uma quantidade suficiente de criaturas, 05 Iks Churrascan irão aparecer empilhados e irão se espalhar para ficar em volta de você, mate eles antes que a fogueira se apague. Realizando a mecânica mencionada um único Iks Ahpututu aparecerá, mate ele e repita essa mecânica até conseguir pelo menos três chisels.
) por serem duas fogueiras próximas uma da outra. Conforme você mate uma quantidade suficiente de criaturas, 05 Iks Churrascan irão aparecer empilhados e irão se espalhar para ficar em volta de você, mate eles antes que a fogueira se apague. Realizando a mecânica mencionada um único Iks Ahpututu aparecerá, mate ele e repita essa mecânica até conseguir pelo menos três chisels.
Para chegar ao boss você precisa desçer até o último andar de Iksupan. Então depois que entrar na cidade, vá e desça (aqui![]() ), vá um pouco para norte e vira a direita e em seguida ande para sudeste até encontrar um buraco (aqui
), vá um pouco para norte e vira a direita e em seguida ande para sudeste até encontrar um buraco (aqui![]() ). Desça e agora vá para a esquerda e siga sempre para o norte, você irá chegar a uma área com lava, passe por ela até chegar a uma sala com uma chama azul
). Desça e agora vá para a esquerda e siga sempre para o norte, você irá chegar a uma área com lava, passe por ela até chegar a uma sala com uma chama azul ![]() (aqui
(aqui![]() ). Passe por essa chama que fica no norte para entrar na sala da alavanca, cuidado pois a direita tem um atalho de saída que leva a entrada da cidade
). Passe por essa chama que fica no norte para entrar na sala da alavanca, cuidado pois a direita tem um atalho de saída que leva a entrada da cidade ![]() .
.
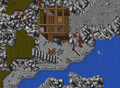
Entrada
Local de chegada.
Iks Churrascan.
Iks Ahpututu.
Acessando sala da alavanca para o boss.
Atalho que leva para a entrada de Iksupan.


Ahau 
Com Chisels
A entrar na sala, você irá se deparar com o Ahau e mais 01 Cobra e 02 Cursed Apes. Este boss tem 4 vidas e vai ficando mais forte a cada vida que se encerra. Caso tenha trazido os 03 Daedal Chisels ![]() , você deverá usá-los em 03 Amphoras
, você deverá usá-los em 03 Amphoras ![]() espalhadas pela sala, cada ânfora representa uma vida a menos do boss, portanto se destruí-las rápido o suficiente, você só precisará matar o boss uma vez.
espalhadas pela sala, cada ânfora representa uma vida a menos do boss, portanto se destruí-las rápido o suficiente, você só precisará matar o boss uma vez.
Ataque o boss e as criaturas e assim que matar os dois Cursed Apes eles não irão renascer, portanto continue focando os ataques no boss até derrotá-lo.
Sem Chisels
A entrar na sala, você irá se deparar com o Ahau e mais 01 Cobra e 02 Cursed Apes. Este boss tem 4 vidas e vai ficando mais forte a cada vida que se encerra.
Ataque o boss e as criaturas e assim que matar os dois Cursed Apes eles irão renascer apenas quando você finalizar uma das vidas do boss. A partir da 2º vez que matar Ahau, a lava dos dois lados da sala começará a "vazar" em direção ao sul ou seja mais SQMs de lava irão aparecer portanto preste atenção aonde está pisando, pois o dano do chão é aproximadamente 1/3 da sua vida. Continue focando os ataques no boss até derrotá-lo.
Ancient Aucar Outfits
Caso seja a primeira vez matando o boss, ao terminar a luta, você irá dropar um Living Idol of Tukh ![]() , ao dar "Use" nele estando dentro da sala do boss você irá ganhar o Ancient Aucar Outfit.
, ao dar "Use" nele estando dentro da sala do boss você irá ganhar o Ancient Aucar Outfit.
Male/Female:


| Broken Iks Set O set consiste das seguintes partes: | ||||||||||||||
| ||||||||||||||
Para garantir o addon 1 do Ancient Aucar Outfits será preciso dropar as partes do Broken Iks Set e estar equipado com ele durante a luta contra o Ahau.
As partes do set dropam de diferentes criaturas (com exceção dos Cursed Apes e Iks Churrascan), portanto mate todas as criaturas que encontrar pelo caminho. Atenção pois o set irá desaparecer então esteja preparado para equipar o set que usa regularmente.
Galthen and the City of Gold II
Ao finalizar a missão anterior, você poderá continuar para a parte II, dirija-se ao NPC Ahau's Dead Chamberlain, localizado próximo ao teleport de entrada ao boss Ahau (aqui![]() ). Fale Hi - Yes e caso já tenha derrotado o boss Ahau ele lhe concederá poder para utilizar a Spheric Teleporter
). Fale Hi - Yes e caso já tenha derrotado o boss Ahau ele lhe concederá poder para utilizar a Spheric Teleporter ![]() próxima a ele.
próxima a ele.
 |
Jogador: Hi
Ahau's Dead Chamberlain: I was not allowed... to speak. Aaahauuu... Now I am allowed... to offer help! Do you accept? |
Após clicar na esfera você será teletransportado para uma nova área e caso queira retornar basta utilizar a Spheric Teleporter que fica ao sul. Para prosseguir na missão suba às escadas ao sudeste desta sala. Neste outro andar que se assemelha a uma tumba há um buraco à direita, desça por ele.
Seu objetivo será chegar aos corredores da cidade perdida, para isso basta seguir o mapa abaixo. Porem além do elevado numero de criaturas, também terá que tomar cuidado com as armadilhas ![]() espalhadas pelo local.
espalhadas pelo local.

Caminho à cidade perdida

Cuidado com as armadilhas que existem pelo caminho, além de produzirem um dano considerável, eles reduzem a pontuação abaixo do nome de seu personagem, que caso chegue a zero o transportará novamente à entrada. Os players que não possuem o Addon 1 do Ancient Aucar Outfits começam com 3 Pontos, e os que possuem tal Addon começam com 99 Pontos, facilitando e muito a ida às profundezas de Iksupan.
Chegando à cidade, o objetivo será obter 4 chaves para acessar um portão Mitmah. A primeira chave chamada The Mitmah South Key ![]() pode ser obtida em 3 diferentes locais (varia de jogador a jogador):
pode ser obtida em 3 diferentes locais (varia de jogador a jogador):
- Em uma pequena sala conectada ao hall de entrada (aqui), clique no baú central da sala. Se este não for o local, você receberá apenas um parchment, siga para o outro local.
- Em uma sala ao sudeste da arena de ouro de Atab, (aqui). Se este não for o local, você receberá apenas um parchment, siga para o outro local.
- Em uma sala no canto noroeste do local, (aqui). Esta sala é acessível apenas ao derrotar o boss Atab uma vez ao menos (Você deverá causar a maior quantidade de dano nele, caso mate em grupo será um boss por jogador).
Com a primeira chave em mãos, dirija-se à sala onde há uma Spheric Teleporter ![]() (aqui
(aqui![]() ). Ao clicar sobre esta esfera você será transportado ao andar acima, em um sistema de águas de Iksupan. Neste local você deverá ativar os mecanismos de drenagem em 4 locais (norte, sul, leste e oeste), no centro da sala central existe uma Spheric Teleporter que o leva à sala anterior no andar abaixo e 4 alavancas para cada uma das direções. Cada alavanca libera o acesso à porta correspondente.
). Ao clicar sobre esta esfera você será transportado ao andar acima, em um sistema de águas de Iksupan. Neste local você deverá ativar os mecanismos de drenagem em 4 locais (norte, sul, leste e oeste), no centro da sala central existe uma Spheric Teleporter que o leva à sala anterior no andar abaixo e 4 alavancas para cada uma das direções. Cada alavanca libera o acesso à porta correspondente.
Cada porta leva a um túnel sem bifurcações com uma outra alavanca em seu final, puxe-a para fazer o mecanismo voltar a funcionar. Repita o processo para todas as alavancas.
| Nota: Junto à alavanca no final de cada um dos caminhos há uma Spheric Teleporter |
Após usar as 4 alavancas dos 4 túneis você terá acesso à uma sala no andar abaixo, clique na Spheric Teleporter do centro da sala, retorne ao andar inferior e dirija-se à esta sala (aqui![]() ), abra o Ornate Case
), abra o Ornate Case ![]() e obtenha a The Mitmah West Key
e obtenha a The Mitmah West Key ![]() .
.
Até este ponto você deve ter 2 das 4 chaves em mãos, para obter a próxima dirija-se à sala imediatamente ao norte (aqui![]() ). Neste local aparece o boss Atab, você deverá matá-lo, e em sua primeira vez ele sempre terá como loot a The Mitmah East Key
). Neste local aparece o boss Atab, você deverá matá-lo, e em sua primeira vez ele sempre terá como loot a The Mitmah East Key ![]() .
.
| Nota: Caso você já tenha o Addon 1 do Ancient Aucar Outfits, este boss poderá teleportá-lo para esta sala (aqui |
Com a terceira chave em mãos, você deverá fazer um ritual para acessar a câmara norte da cidade, onde está o museu dos Mitmah. O item necessário para tal ritual é o Ancient Iks Ritual Chalice que pode ser obtido como loot dos Iks Yapunacs. Com o cálice em mãos, use-o em um Empty Bucket (Iksupan) localizado (aqui![]() ), um ritual começará e dezenas de Ancient Ugly Monsters nascerão por toda a área, ao mesmo tempo nascerá um Ritualwater, empurre-o até o lado de algum dos Empty Basin
), um ritual começará e dezenas de Ancient Ugly Monsters nascerão por toda a área, ao mesmo tempo nascerá um Ritualwater, empurre-o até o lado de algum dos Empty Basin  que estão ao norte, há um na direita e outro na esquerda e qualquer um deles funcionará para a mecânica. Quando o Ritualwater for empurrado próximo ao basin seu questlog será atualizado, os Ancient Ugly Monsters se transformarão em Cursed Apes e você receberá acesso ao museu, cujo portão está no centro-norte desta sala (aqui
![]() ).
).
Dentro do museu, vá para a sala que encontra-se à sudoeste do local (aqui![]() ) e abra o barril, você receberá um Pilchi With Paint. Além da tinta, você deverá obter o Ceremonial Brush que é loot das criaturas Mitmah Seer e Mitmah Scout.
) e abra o barril, você receberá um Pilchi With Paint. Além da tinta, você deverá obter o Ceremonial Brush que é loot das criaturas Mitmah Seer e Mitmah Scout.
| Nota: Para sair do museu, basta dar use em uma Spheric Teleporter localizado no sul do local. |
Com ambos itens em mãos, você deverá pintar as bordas de pelo menos 3 portas, que podem ser encontradas tanto na porção mais profunda da Iksupan, como a mais superficial. Alguns exemplos de locais onde estas portas podem ser encontradas estão (aqui![]() ), (aqui
), (aqui![]() ) e (aqui
) e (aqui![]() ). Para realizar a pintura, basta dar use com o Ceremonial Brush na porta.
). Para realizar a pintura, basta dar use com o Ceremonial Brush na porta.
Após pintar 3 portas, volte ao museu (aqui![]() ). Você agora possuirá acesso a esta sala (aqui
). Você agora possuirá acesso a esta sala (aqui![]() ), busque por um Pile of Bones
), busque por um Pile of Bones ![]() , abra-o e obtenha a The Mitmah North Key
, abra-o e obtenha a The Mitmah North Key ![]() .
.
Com as 4 chaves em sua bolsa, dirija-se ao norte do museu (aqui![]() ), e use qualquer uma das chaves no Monumental Gate
), e use qualquer uma das chaves no Monumental Gate  , você será transportado à parte norte. Nesta nova sala há alguns Mitmah Seers e o teleport que leva ao boss Mitmah Vanguard.
Mitmah Vanguard 
Este boss permite até 5 jogadores, e apesar de ter relativamente uma pequena quantidade de hitpoints, seu dano não deve ser subestimado. Busque entrar na sala com toda a proteção de Energy possível, o Elite Knight deve manter-se no centro da sala e preferentemente os shooters a uma grande distância. De tempos em tempos ele teleportará pela sala curando no processo, além disso, o seu ataque mais forte, em grande área pode facilmente causar danos de 6.000 - 7.000 hitpoints em personagens sem proteção a Energy. Junto ao boss participarão algumas criaturas como Iks Yapunacs, Mitmah Seers e Mitmah Scouts.
Extras
Galthen's Satchel e Artefact Box
Após concluir a quest, será possível obter 01 Galthen's Satchel ![]() com 01 Artefact Box
com 01 Artefact Box ![]() dentro dela a cada 30 dias, na mesma árvore submersa. Fale VBOX para o NPC An Idol para ser teleportado.
dentro dela a cada 30 dias, na mesma árvore submersa. Fale VBOX para o NPC An Idol para ser teleportado.
Megasylvan Plant
Ao usar o item Megasylvan Sapling ![]() em um Empty Flower Pot
em um Empty Flower Pot ![]() você irá obter um Pot with Sylvan Earth
você irá obter um Pot with Sylvan Earth ![]() e ao dar "use" nele dentro da sua casa você obtém uma Megasylvan Plant
e ao dar "use" nele dentro da sua casa você obtém uma Megasylvan Plant 
Parabéns, você concluiu a quest!
Para addons do outfit, confira outros spoilers:
- Addons 1 & 2: Ancient Aucar Outfits Quest.
- Addons 1 & 2: Royal Bounacean Advisor Outfits Quest.
Vídeos
Os vídeos foram produzidos na versão Patches/13.36.0000 e se mantém atualizados.