|
|||
|
|
|
||||||||||||||||||||||||


The Roost of the Graveborn Quest: mudanças entre as edições
| [edição aprovada] | [edição aprovada] |
| (38 revisões intermediárias por 2 usuários não estão sendo mostradas) | |||
| Linha 1: | Linha 1: | ||
{{Infobox_Quest|List={{{1|}}}|GetValue={{{GetValue|}}} | {{Infobox_Quest|List={{{1|}}}|GetValue={{{GetValue|}}} | ||
| name = Roost of the Graveborn Quest | | name = Roost of the Graveborn Quest | ||
| reward = | | reward = Acesso rápido a [[Draconia]] e hunts [[Outer Crypt]], [[Inner Crypt]] e [[Unhallowed Crypt]] | ||
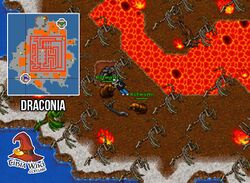
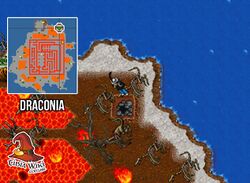
| location = [[Ab'Dendriel]], [[Ankrahmun]], [[Okolnir]], [[ | | location = [[Ab'Dendriel]], [[Ankrahmun]], [[Draconia]], [[Okolnir]], [[Plains of Havoc]], [[Thais]]. | ||
| questloc = | | questloc = | ||
| lvl = 450 | | lvl = 450 | ||
| lvlreq = 800+ | | lvlreq = 800+ | ||
| duration = | | duration = 2 horas | ||
| team = 4 jogadores | | team = 4 jogadores | ||
| teamnote = | | teamnote = | ||
| dif = 5 | | dif = 5 | ||
| premium = sim | | premium = sim | ||
| dangers = [[ | | dangers = [[Walking Dread]], [[Crypt Construct]], [[Haunted Hunter]] | ||
| mini = | | mini = | ||
| bosses = [[Adventurer Group]], [[Eldritch Dragon Lord]], [[Ice Horror]]. | | bosses = [[Adventurer Group]], [[Eldritch Dragon Lord]], [[Ice Horror]], [[The Gravedigger]], [[Bone Overlord]]. | ||
| imgleg = | | imgleg = Bone Overlord | ||
| legend = | | legend = A Graveborn Quest leva você ao coração de uma perturbação espiritual no Cemitério dos Dragões, onde forças sombrias profanam o descanso dos ancestrais e manipulam suas almas. Guiado por S’Zallar M’Andar, você atravessa tumbas, gelo, lava e os salões profanados de Draconia em busca de tokens capazes de libertar esses espíritos. Cada boss apresenta mecânicas únicas: ondas mortais, erupções, gelo traiçoeiro e necromancia profunda, até revelar o verdadeiro responsável pela corrupção: o temível Bone Overlord. Uma jornada intensa de investigação, estratégia e combate. | ||
| implemented = | | implemented = 15.20.7a5cc9 | ||
| spoiler = | | spoiler = | ||
= Método = | = Método = | ||
== Requerimentos == | == Requerimentos == | ||
* [[Arquivo:Key 3012.gif]] [[Key 3012]] — necessária para acessar o Hellgate a caminho de [[Draconia]]. | |||
* [[Arquivo:White Mushroom.gif]] [[White Mushroom]] — recomendado para facilitar o retorno de [[Draconia]]. | |||
* [[Arquivo:Jade Dragon Head.gif]] [[Jade Dragon Head]] — obtido durante a quest e '''obrigatoriamente necessário''' em '''todas''' as batalhas contra os bosses. | |||
* [[Arquivo:Blood.gif]] [[Blood]], [[Arquivo:The Holy Tible.gif]] [[The Holy Tible]], [[Arquivo:Oil.gif]] [[Oil]] — recomendado para acesso rápido aos ''Dragon Lords da Pits of Inferno''. | |||
* [[Arquivo:Dwarven Ring.gif]] [[Dwarven Ring]]. | |||
== Walk of Death == | == Walk of Death == | ||
| Linha 48: | Linha 53: | ||
}} | }} | ||
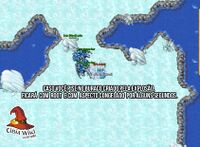
S’Zallar M’Andar sente uma grande perturbação entre os espíritos dos dragões antigos e '''pede sua ajuda para investigar o cemitério dos dragões''', um local sagrado onde ele não pode entrar. | '''S’Zallar M’Andar''' sente uma grande perturbação entre os espíritos dos dragões antigos e '''pede sua ajuda para investigar o cemitério dos dragões''', um local sagrado onde ele não pode entrar. | ||
Ele entrega um | {{DASH|img=Jade Dragon Head| * Ele te entrega um [[Jade Dragon Head]].</br> | ||
* Um dispositivo que funciona como um '''comunicador entre você e ele''', permitindo '''reportar as lutas contra os bosses à distância''' sem a necessidade de retornar ao NPC. }} | |||
Siga até [[Draconia]] ({{Mapa|32785,31606,7:1|aqui}}) para descobrir a origem da inquietação. '''Ao chegar''' em [[Draconia]], '''se comunique''' com o S’Zallar M’Andar '''usando o [[Arquivo:Jade Dragon Head.gif]] [[Jade Dragon Head]]'''. | |||
<gallery mode="nolines" widths="250px" heights="250px"> | |||
Arquivo:Graveborn - Draconia.jpg| Chegada em Draconia | |||
</gallery> | |||
{{Transcrições|npc=S'Zallar M'Andar|texto= | {{Transcrições|npc=S'Zallar M'Andar|texto= | ||
'''S'Zallar M'Andar:''' You arrived. Great! Now investigate the Dragon Cemetery for a hint about what is going on there. | '''S'Zallar M'Andar:''' You arrived. Great! Now investigate the Dragon Cemetery for a hint about what is going on there. | ||
}} | }} | ||
'''S’Zallar M’Andar''' agradece sua chegada e instrui você a '''investigar o Dragon Cemetery''' em busca de pistas sobre o que está causando a inquietação entre os espíritos dos dragões. | |||
== Digging Deeper == | == Digging Deeper == | ||
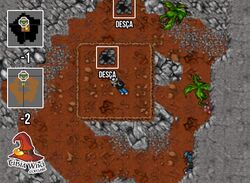
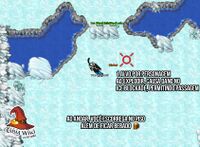
Desça o buraco | Desça o buraco ao nordeste ({{Mapa|32814,31561,7:1|aqui}}), depois continue descendo mais dois andares ({{Mapa|32813,31559,8:2|aqui}} e {{Mapa|32813,31555,9:2|aqui}}) em um caminho único até encontrar o NPC [[Dragon Ancestor Spirit]]. | ||
<gallery mode="nolines" widths="250px" heights="250px"> | |||
Arquivo:Graveborn - Draconia Buraco Dragon.jpg| Buraco Dragon Ancestor | |||
Arquivo:Graveborn - Draconia Caminho Dragon.jpg| Caminho Dragon Ancestor | |||
Arquivo:Graveborn - Draconia Dragon Ancestor.jpg| Dragon Ancestor | |||
</gallery> | |||
Fale '''hi - spirit'''. | |||
{{Transcrições|npc=Dragon Ancestor Spirit|texto= | {{Transcrições|npc=Dragon Ancestor Spirit|texto= | ||
''Jogador:'' '''Hi'''<br/> | |||
'''Dragon Ancestor Spirit:''' This one knows you came here for the disturbance of the spirit world!<br/> | '''Dragon Ancestor Spirit:''' This one knows you came here for the disturbance of the spirit world!<br/> | ||
''Jogador:'' '''Spirit'''<br/> | ''Jogador:'' '''Spirit'''<br/> | ||
| Linha 97: | Linha 116: | ||
Para isso, é '''necessário encontrar os quatro tesouros sagrados dos dragões''' e '''tocá-los''' enquanto estiver com o '''Jade Dragon Head''' em seu inventário. | Para isso, é '''necessário encontrar os quatro tesouros sagrados dos dragões''' e '''tocá-los''' enquanto estiver com o '''Jade Dragon Head''' em seu inventário. | ||
[[Arquivo:Charred_Skull.gif]] [[Arquivo:Molten Throne.gif]] [[Arquivo:Draconic_Rattle.gif]] [[Arquivo:Gilded_Wig.gif]] | |||
Cada um está localizado em um '''teleporte verde''' liberado '''após vencer''' a luta de cada um dos '''bosses'''. | |||
<span style="display:inline-block; width:100%; text-align:center; color:#000000; font-size:12px"><b>Clique no menu para ter mais informações abaixo.</b></span></br> | <span style="display:inline-block; width:100%; text-align:center; color:#000000; font-size:12px"><b>Clique no menu para ter mais informações abaixo.</b></span></br> | ||
| Linha 109: | Linha 128: | ||
| imgBtn01 = Adventurer Group | | imgBtn01 = Adventurer Group | ||
| imgBtnSize01 = 56 | | imgBtnSize01 = 56 | ||
| txtBtn01 = <span style="font-size:16px;">1º - The First Dragon</span></br><span style="font-size:12px;"> | | txtBtn01 = <span style="font-size:16px;">1º - The First Dragon</span></br><span style="font-size:12px;">Boss - Adventurer Group</span> | ||
| tituloTxtBtn01 = Boss - Adventurer Group | | tituloTxtBtn01 = Boss - Adventurer Group | ||
| spoilerTxtBtn01 = | | spoilerTxtBtn01 = | ||
| Linha 115: | Linha 134: | ||
== 1º - The First Dragon == | == 1º - The First Dragon == | ||
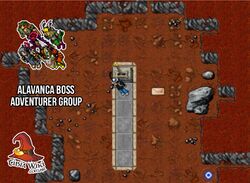
* '''Local''': Thais – Subsolo de Greenshore | * '''Local''': Thais – ''Subsolo de Greenshore'' ({{Mapa|32270,32125,9:2|aqui}}) | ||
* '''Requerimentos''': | <gallery mode="nolines" widths="250px" heights="250px"> | ||
* '''Proteções''': | Arquivo:Adventurer Group - Local.jpg| Local Adventurer Group | ||
Arquivo:Adventurer Group - TP.jpg| TP Adventurer's Group | |||
</gallery> | |||
* '''Requerimentos''': | |||
** Leve sua [[Arquivo:Jade Dragon Head.gif]] [[Jade Dragon Head]] contigo. | |||
* '''Proteções''': [[Arquivo:Burning_Icon.gif]] [[Fire]], [[Arquivo:Electrified_Icon.gif]] [[Energy]], [[Arquivo:Freezing_Icon.gif]] [[Ice]], [[Arquivo:Poisoned_Icon.gif]] [[Earth]], [[Arquivo:F%C3%ADsico.png]] [[Physical]], [[Arquivo:Dazzled_Icon.gif]] [[Holy]]. | |||
* '''Mecânica''': | * '''Mecânica''': | ||
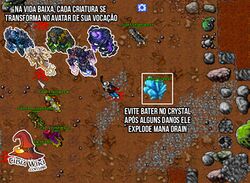
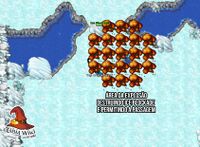
** Dentro da sala haverá um grupo de cinco criaturas, cada uma representando uma vocação: | |||
** Quando qualquer '''criatura atingir a vida vermelha, ela se transformará em um Avatar da respectiva vocação''', passando a causar apenas ataques críticos e sofrer menos dano. | |||
<table style="text-align:center; width:100%;"> | |||
<tr> | |||
<th>Sorcerer</th> | |||
<th>Druid</th> | |||
<th>Monk</th> | |||
<th>Paladin</th> | |||
<th>Knight</th> | |||
</tr> | |||
<tr> | |||
<td>[[Fiona Firstdream]]<br>[[Arquivo:Fiona Firstdream.gif]]</td> | |||
<td>[[Grendel Greenlunch]]<br>[[Arquivo:Grendel Greenlunch.gif]]</td> | |||
<td>[[Nigel Neverguess]]<br>[[Arquivo:Nigel Neverguess.gif]]</td> | |||
<td>[[Percy Peacetinker]]<br>[[Arquivo:Percy Peacetinker.gif]]</td> | |||
<td>[[Yorik Youngbook]]<br>[[Arquivo:Yorik Youngbook.gif]]</td> | |||
</tr> | |||
<tr> | |||
<td>[[Avatar of Storm]]<br>[[Arquivo:Avatar of Storm (Sprite).gif]]</td> | |||
<td>[[Avatar of Nature]]<br>[[Arquivo:Avatar of Nature (Sprite).gif]]</td> | |||
<td>[[Avatar of Balance]]<br>[[Arquivo:Avatar of Balance (Sprite).gif]]</td> | |||
<td>[[Avatar of Light]]<br>[[Arquivo:Avatar of Light (Sprite).gif]]</td> | |||
<td>[[Avatar of Steel]]<br>[[Arquivo:Avatar of Steel (Sprite).gif]]</td> | |||
</tr> | |||
</table> | |||
{{DASH|img=Warning Sign|'''Atenção''': '''Definam''' uma '''ordem''' para levar '''cada criatura ao red e transformá-la em avatar'''. Como os avatares aplicam '''golpes críticos em todos os ataques''', lidar com dois ou mais ao mesmo tempo pode ser fatal. Mantendo '''apenas um avatar ativo por vez''', a '''batalha''' se torna '''muito mais controlada e segura'''.}} | |||
<gallery mode="nolines" widths="250px" heights="250px"> | |||
Arquivo:Adventurer Group - Explicacao.jpg| Explicação | |||
</gallery> | |||
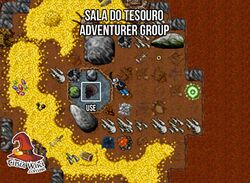
* Após derrotar todas as cinco criaturas, surgirá a criatura final: [[Fatal Bug]] [[Arquivo:Fatal Bug.gif]]. | |||
* Ao fim da luta use o teleporte '''verde''' ao sul da sala e clique na [[Charred Skull]] [[Arquivo:Charred Skull.gif]] para concluir esta etapa e habilitar o reporte da missão. | |||
<gallery mode="nolines" widths="250px" heights="250px"> | <gallery mode="nolines" widths="250px" heights="250px"> | ||
Arquivo:Adventurer Group - | Arquivo:Adventurer Group - Charred Skull.jpg| Charred Skull | ||
</gallery> | </gallery> | ||
| Linha 160: | Linha 196: | ||
| imgBtn02 = Eldritch Dragon Lord | | imgBtn02 = Eldritch Dragon Lord | ||
| imgBtnSize02 = 56 | | imgBtnSize02 = 56 | ||
| txtBtn02 = <span style="font-size:16px;">2º - Under Fire</span></br><span style="font-size:12px;"> | | txtBtn02 = <span style="font-size:16px;">2º - Under Fire</span></br><span style="font-size:12px;">Boss - Eldritch Dragon Lord</span> | ||
| tituloTxtBtn02 = Boss Eldritch Dragon Lord | | tituloTxtBtn02 = Boss Eldritch Dragon Lord | ||
| spoilerTxtBtn02 = | | spoilerTxtBtn02 = | ||
<!------------------------------- INÍCIO DO TEXTO DO SPOILER P/ O BOTÂO Nº 02 ---------------------------------------------------> | <!------------------------------- INÍCIO DO TEXTO DO SPOILER P/ O BOTÂO Nº 02 ---------------------------------------------------> | ||
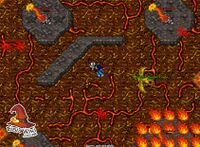
== 2º - Under Fire == | == 2º - Under Fire == | ||
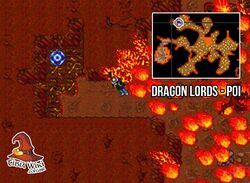
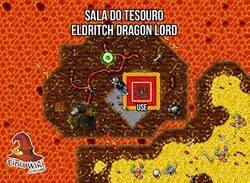
* Local: ({{Mapa|32757,32306,12:1|aqui}}) | * '''Local''': Plains of Havoc - ''Dragon Lords Pits of Inferno'' ({{Mapa|32757,32306,12:1|aqui}}) | ||
* Requerimentos: Ter vencido a batalha do boss [[Adventurer Group]]. | <gallery mode="nolines" widths="250px" heights="250px"> | ||
* Proteções: | Arquivo:Eldritch Dragon Lord - Local.jpg| Local Eldritch Dragon Lord | ||
* Mecânica: | Arquivo:Eldritch Dragon Lord - TP.jpg| TP Eldritch Dragon Lord | ||
</gallery> | |||
* '''Requerimentos''': | |||
** Ter vencido a batalha do boss [[Adventurer Group]]. | |||
A | ** Leve sua [[Arquivo:Jade Dragon Head.gif]] [[Jade Dragon Head]] contigo. | ||
** ''Para acesso rápido'': [[Arquivo:Blood.gif]] [[Blood]], [[Arquivo:The Holy Tible.gif]] [[The Holy Tible]], [[Arquivo:Oil.gif]] [[Oil]] | |||
* '''Proteções''': [[Arquivo:Burning_Icon.gif]] [[Fire]] | |||
* '''Mecânica''': | |||
** [[Arquivo:Eldritch Dragon Lord.gif]] Enfrente o boss [[Eldritch Dragon Lord]]. | |||
** Existem 4 [[Pulsating Lava]]s (''vulcões'') espalhados pela sala. | |||
** A cada turno, os [[Pulsating Lava]] ganham vida, tornando-se uma [[Eruption]] e, por fim, um [[Flame Totem]] quando acumula vida suficiente. | |||
** [[Arquivo:Pulsating Lava.gif]] → [[Arquivo:Eruption.gif]] → [[Arquivo:Flame Totem.gif]] | |||
[[Arquivo:Molten Throne.gif | ** Caso existam '''3 ou mais''' [[Flame Totem]]s ativos ao mesmo tempo, o boss se tornará '''imortal'''. | ||
** Controle o dano no boss e '''mantenha ao menos 2''' [[Pulsating Lava]] enfraquecidos para garantir que o '''boss permaneça sempre mortal'''. | |||
** Aproximadamente três vezes durante a luta, ao reduzir certa quantidade de vida do boss, todos os [[Pulsating Lava]]s ganharão vida e serão transformados automaticamente em [[Flame Totem]]s, independente da vida atual. | |||
** O '''boss se cura com dano de fogo'''; como os vulcões causam dano equivalente a um '''exori''' de fogo, mantenha '''o boss sempre a pelo menos 2 SQMs dos vulcões'''. | |||
<gallery mode="nolines" widths="200px" heights="200px"> | |||
Arquivo:Eldritch Dragon Lord - Explicacao.jpg| Explicação | |||
Arquivo:Eldritch Dragon Lord - Explicacao Eruption.jpg| Eruption | |||
Arquivo:Eldritch Dragon Lord - Explicacao Flame Totem.jpg| Flame Totem | |||
</gallery> | |||
* '''Após luta do boss''' entre no '''teleporte verde''' e clique no [[Molten Throne]] [[Arquivo:Molten Throne.gif]] | |||
<gallery mode="nolines" widths="250px" heights="250px"> | |||
Arquivo:Eldritch Dragon Lord - Molten Throne.jpg| Molten Throne | |||
</gallery> | |||
=== Report your progress === | === Report your progress === | ||
| Linha 198: | Linha 246: | ||
| imgBtn03 = Ice Horror | | imgBtn03 = Ice Horror | ||
| imgBtnSize03 = 56 | | imgBtnSize03 = 56 | ||
| txtBtn03 = <span style="font-size:16px;">3º - The Frozen Hoard</span></br><span style="font-size:12px;"> | | txtBtn03 = <span style="font-size:16px;">3º - The Frozen Hoard</span></br><span style="font-size:12px;">Boss - Ice Horror</span> | ||
| tituloTxtBtn03 = Boss Ice Horror | | tituloTxtBtn03 = Boss Ice Horror | ||
| spoilerTxtBtn03 = | | spoilerTxtBtn03 = | ||
<!------------------------------- INÍCIO DO TEXTO DO SPOILER P/ O BOTÂO Nº 03 ---------------------------------------------------> | <!------------------------------- INÍCIO DO TEXTO DO SPOILER P/ O BOTÂO Nº 03 ---------------------------------------------------> | ||
== 3º - The Frozen Hoard == | == 3º - The Frozen Hoard == | ||
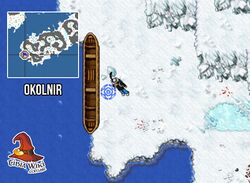
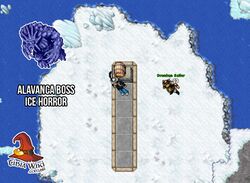
* Local: ({{Mapa|32151,31451,7:1|aqui}}) | * '''Local''': Svarground - ''Okolnir'' ({{Mapa|32151,31451,7:1|aqui}}) | ||
* Requerimentos: Ter vencido a batalha do boss [[ | <gallery mode="nolines" widths="250px" heights="250px"> | ||
* Proteções: | Arquivo:Ice Horror - Local.jpg| Local Ice Horror | ||
* Mecânica: | Arquivo:Ice Horror - TP.jpg| TP Ice Horror | ||
</gallery> | |||
* '''Requerimentos''': | |||
** Ter vencido a batalha do boss [[Eldritch Dragon Lord]]. | |||
** Leve sua [[Arquivo:Jade Dragon Head.gif]] [[Jade Dragon Head]] contigo. | |||
** [[Arquivo:Fire Bomb Rune.gif]] [[Fire Bomb]]s. | |||
* '''Proteções''': [[Arquivo:Freezing_Icon.gif]] [[Ice]], [[Arquivo:Cursed_Icon.gif]] [[Death]] | |||
* '''Mecânica''': | |||
** Seu objetivo é '''derrotar o boss''' [[Ice Horror]] [[Arquivo:Ice Horror.gif]]. | |||
** Para '''chegar até ele''', será necessário '''atravessar duas barreiras''' de [[Ice Blockade]]s. | |||
** Para destruir um [[Ice Blockade]], posicione-se próximo e aguarde um alvo aparecer perto da barreira. | |||
** O '''dano do alvo''' destruirá o [[Ice Blockade]]. | |||
** Quando o '''alvo surgir''', '''saia imediatamente de cima''': a explosão criará um '''buraco''' que causa '''root''' e o efeito de congelado se o jogador estiver sobre ele. | |||
** Após remover ambas as barreiras, recomenda-se que o '''time se posicione''' em '''um canto''' da sala. | |||
** O boss possui '''alta resiliência no início''' da luta. | |||
** Além do seu dano, os próprios '''alvos também causam dano no boss'''. | |||
** Utilize [[Fire Bomb]]s nos pés para evitar o efeito de [[Fear]]. | |||
** Ao atingir certa quantidade de vida, o boss fará surgir uma '''invasão''' de [[Ice Crawler]]s. '''Sobreviva''' por alguns segundos '''até que os alvos e seus danos as eliminem''', deixando a batalha mais tranquila. | |||
<gallery mode="nolines" widths="200px" heights="200px"> | |||
Arquivo:Ice Horror - Alvo.jpg| Mecânica Alvo - Escorregar - Drunk | |||
Arquivo:Ice Horror - Ice Blockade 1.jpg| Alvo destruindo Ice Blockade | |||
Arquivo:Ice Horror - Root.jpg| Root ao pisar no piso destruído | |||
Arquivo:Ice Horror - Ice Blockade 2.jpg| Segunda barreira | |||
Arquivo:Ice Horror - Posicionamento.jpg| Posicionamento do time | |||
Arquivo:Ice Horror - Invasao.jpg| Invasão Ice Crawlers | |||
</gallery> | |||
[[Arquivo: | * '''Após luta do boss''' entre no '''teleporte verde''' e clique no [[Draconic Rattle]] [[Arquivo:Draconic Rattle.gif]] | ||
<gallery mode="nolines" widths="250px" heights="250px"> | <gallery mode="nolines" widths="250px" heights="250px"> | ||
Arquivo:Ice Horror - | Arquivo:Ice Horror - Draconic Rattle.jpg| Draconic Rattle | ||
</gallery> | </gallery> | ||
| Linha 226: | Linha 297: | ||
'''S'Zallar M'Andar:''' Again you were successful. The last hoard is located in the Mountain that seperates destert and jungle in Darama. Attune to the prized possession there while having the jade talsiman with you.<br/> | '''S'Zallar M'Andar:''' Again you were successful. The last hoard is located in the Mountain that seperates destert and jungle in Darama. Attune to the prized possession there while having the jade talsiman with you.<br/> | ||
}} | }} | ||
{{Separador}} | {{Separador}} | ||
| Linha 232: | Linha 302: | ||
| imgBtn04 = The Gravedigger | | imgBtn04 = The Gravedigger | ||
| imgBtnSize04 = 56 | | imgBtnSize04 = 56 | ||
| txtBtn04 = <span style="font-size:16px;">4º - The Last Dragon Soul</span></br><span style="font-size:12px;"> | | txtBtn04 = <span style="font-size:16px;">4º - The Last Dragon Soul</span></br><span style="font-size:12px;">Boss - The Gravedigger</span> | ||
| tituloTxtBtn04 = Boss The Gravedigger | | tituloTxtBtn04 = Boss The Gravedigger | ||
| spoilerTxtBtn04 = | | spoilerTxtBtn04 = | ||
<!------------------------------- INÍCIO DO TEXTO DO SPOILER P/ O BOTÂO Nº 04 ---------------------------------------------------> | <!------------------------------- INÍCIO DO TEXTO DO SPOILER P/ O BOTÂO Nº 04 ---------------------------------------------------> | ||
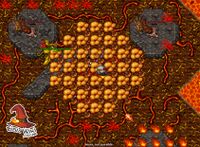
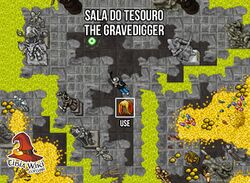
== 4º - The Last Dragon Soul == | == 4º - The Last Dragon Soul == | ||
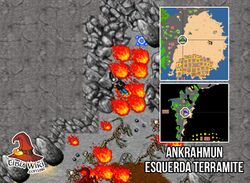
* Local: | * '''Local''': Ankrahmun - ''Esquerda Terramite'' ({{Mapa|33049,32681,4:1|aqui}}) | ||
* Requerimentos: | <gallery mode="nolines" widths="250px" heights="250px"> | ||
* Proteções: | Arquivo:The Gravedigger - Local.jpg| Local The Gravedigger | ||
* Mecânica: | Arquivo:The Gravedigger - TP.jpg| TP The Gravedigger | ||
* | </gallery> | ||
* | * '''Requerimentos''': | ||
* | ** Ter vencido a batalha do boss [[Ice Horror]]. | ||
* Ao | ** Leve sua [[Arquivo:Jade Dragon Head.gif]] [[Jade Dragon Head]] contigo. | ||
* | ** [[Arquivo:Dwarven Ring.gif]] [[Dwarven Ring]]. | ||
* '''Proteções''': [[Arquivo:Cursed_Icon.gif]] [[Death]] | |||
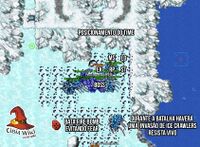
* '''Mecânica''': | |||
** Seu objetivo é '''derrotar o boss''' [[The Gravedigger]] [[Arquivo:The Gravedigger.gif]]. | |||
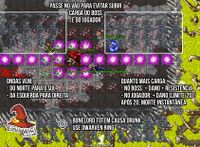
** O '''chão da sala''' faz o jogador '''andar devagar'''. | |||
** Durante a luta, haverão '''ondas''' que surgem do '''norte para o sul''' e da '''esquerda para a direita'''. | |||
** Caso o '''jogador atravesse uma onda''', ele receberá '''+1 carga''' ('''ou mais''', dependendo do tempo que permanecer dentro dela). | |||
** Se o '''jogador atingir 21 cargas''', será '''morto instantaneamente'''. | |||
** Se o '''boss passar por uma onda''', ele também '''ganhará cargas''', tornando-se '''mais forte e resistente'''. | |||
** Para '''evitar o aumento das cargas''' (tanto no jogador quanto no boss), é necessário '''passar pelos vãos entre as ondas'''. | |||
** Há '''totens espalhados pela sala''' que dificultam a movimentação além disso eles causam '''drunk''', portanto recomenda-se o uso de [[Dwarven Ring]]. | |||
** A '''comunicação do time é essencial''' para coordenar desvios e finalizar o boss com segurança. | |||
{{DASH|[[Arquivo:Achievement.gif|link=]] Ao derrotar o [[The Gravedigger]] possuindo ao menos 18 cargas, o jogador recebe o achievement '''"{{Achievement|Razor's Edge}}"'''.}} | |||
<gallery mode="nolines" widths="200px" heights="200px"> | |||
Arquivo:The Gravedigger - Explicacao.jpg| Explicação | |||
</gallery> | |||
* '''Após luta do boss''' entre no '''teleporte verde''' e clique no [[Gilded Wig]] [[Arquivo:Gilded Wig.gif]] | |||
<gallery mode="nolines" widths="250px" heights="250px"> | |||
Arquivo:The Gravedigger - Gilded Wig.jpg| Gilded Wig | |||
</gallery> | |||
=== Report your progress === | |||
Para reportar a missão, você pode usar sua [[Arquivo:Jade Dragon Head.gif]] [[Jade Dragon Head]] ou reportar diretamente a missão no NPC [[S'Zallar M'Andar]] com '''hi - mission'''. | |||
{{Transcrições|npc=S'Zallar M'Andar|texto= | |||
''Jogador:'' '''Hi'''<br/> | |||
'''S'Zallar M'Andar:''' Ah, the unscaled adventurer! I know, you are here to talk about our mission or have you lost your talisman?<br/> | |||
''Jogador:'' '''Mission'''<br/> | |||
'''S'Zallar M'Andar:''' You have attuned to all four ancients. Return to me in Ab'Dendriel and use my canoe to travel to the dragon cemetery again and confront the necromancer who is responsible for this atrocity.<br/> | |||
}} | |||
{{Separador}} | {{Separador}} | ||
| Linha 254: | Linha 355: | ||
== The Graveborn's Puppeteer == | == The Graveborn's Puppeteer == | ||
'''Após matar os 4 bosses''' retorne até o NPC [[S'Zallar M'Andar]] e solicite a nova missão dizendo: '''hi - mission'''. | |||
{{Transcrições|npc=S'Zallar M'Andar|texto= | |||
''Jogador:'' '''Hi'''<br/> | |||
'''S'Zallar M'Andar:''' Ah, the unscaled adventurer! I know, you are here to talk about our mission or have you lost your talisman?<br/> | |||
''Jogador:'' '''Mission'''<br/> | |||
'''S'Zallar M'Andar:''' You are now prepared to face the vile necromancer. Imbued with the souls of the ancients, you should be able to free them from whatever the necromancer has trapped them in. ...<br/> | |||
'''S'Zallar M'Andar:''' I prepared my canoe with ancient magic, to find its way through the spirit mists that shroud and protect the isle.. ...<br/> | |||
'''S'Zallar M'Andar:''' If you are ready to face the threat, just ask me for a passage.<br/> | |||
}} | |||
A partir deste momento, o NPC [[S'Zallar M'Andar]] oferecerá uma passagem direta para Draconia. | |||
Fale: '''hi - passage - yes''' | |||
{{Transcrições|npc=S'Zallar M'Andar|texto= | |||
''Jogador:'' '''Hi'''<br/> | |||
'''S'Zallar M'Andar:''' Ah, the unscaled adventurer! I know, you are here to talk about our mission or have you lost your talisman?<br/> | |||
''Jogador:'' '''Passage'''<br/> | |||
'''S'Zallar M'Andar:''' Do you want to use my canoe for a passage to draconia? Yes or no?<br/> | |||
''Jogador:'' '''Yes'''<br/> | |||
'''S'Zallar M'Andar:''' Safe travels.<br/> | |||
}} | |||
'''Antes de prosseguir''', confirme se sua missão foi atualizada no questlog. | |||
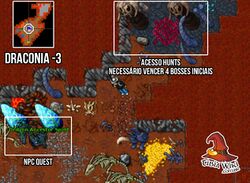
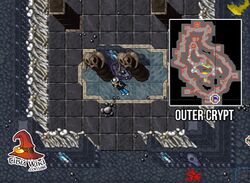
Você também ganhou acesso às hunts: para entrar na [[Outer Crypt]], utilize o teleporte à esquerda logo após o NPC [[Dragon Ancestor Spirit]]. | |||
<gallery mode="nolines" widths="250px" heights="250px"> | |||
Arquivo:Graveborn - Draconia Dragon Ancestor.jpg| Dragon Ancestor | |||
</gallery> | |||
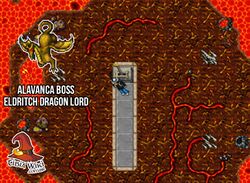
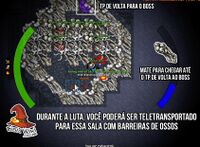
Agora chegou o momento de enfrentar o boss final, o [[Bone Overlord]], localizado em [[Outer Crypt]] ({{Mapa|32926,31779,11:1|aqui}}). | |||
* '''Local''': Sudeste Outer Crypt ({{Mapa|32926,31779,11:1|aqui}}) | |||
<gallery mode="nolines" widths="250px" heights="250px"> | |||
Arquivo:Graveborn - Bone Overlord TP.jpg| Bone Overlord TP | |||
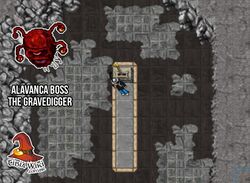
Arquivo:Graveborn - Bone Overlord Alavanca.jpg| Alavanca Bone Overlord | |||
</gallery> | |||
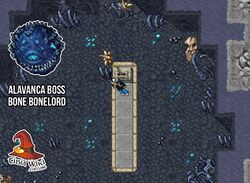
* '''Requerimentos''': | |||
** Ter vencido os quatro bosses anteriores: [[Adventurer Group]], [[Eldritch Dragon Lord]], [[Ice Horror]], [[The Gravedigger]]. | |||
** [[Arquivo:Fire Bomb Rune.gif]] [[Fire Bomb]]. | |||
* '''Proteções''': [[Arquivo:F%C3%ADsico.png]] [[Physical Damage|Physical]], [[Arquivo:Cursed_Icon.gif]] [[Death]] , [[Arquivo:Freezing_Icon.gif]] [[Ice]], [[Arquivo:Electrified_Icon.gif]] [[Energy]], [[Arquivo:Life_Drain_Icone.gif]] [[Life Drain]]. | |||
* '''Mecânica''': | |||
** Haverão '''4 Soul Cages''' (''Pilares'') na sala, além de '''4 Dragões''', cada um correspondendo ao pilar de mesmo nome. | |||
** Seu objetivo inicial é '''destruir os 4 Soul Cages'''. Ao destruir um pilar, o dragão correspondente também morrerá. | |||
** Jogue '''[[Fire Bomb]]''' no chão, pois os dragões aplicam '''Fear'''. | |||
** '''Cada Soul Cage''' possui uma '''fraqueza específica''': | |||
*** [[Arquivo:Zharvorin's Soulcage.gif]] [[Zharvorin's Soulcage]] (''norte direita''): [[Arquivo:Cursed_Icon.gif]] [[Death]] | |||
*** [[Arquivo:Elyrax's Soulcage.gif]] [[Elyrax's Soulcage]] (''sul direita''): [[Arquivo:Cursed_Icon.gif]] [[Death]] | |||
*** [[Arquivo:Scarith's Soulcage.gif]] [[Scarith's Soulcage]] (''sul esquerda''): [[Arquivo:Freezing_Icon.gif]] [[Ice]] | |||
*** [[Arquivo:Myzareth's Soulcage.gif]] [[Myzareth's Soulcage]] (''norte esquerda''): [[Arquivo:Electrified_Icon.gif]] [[Energy]] | |||
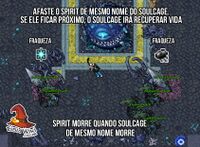
** [[Arquivo:Myzareth's Spirit.gif]] Não permita que o dragão ('''Spirit''') de mesmo nome fique próximo ao seu Soul Cage, pois ele '''irá recuperar vida''' do soulcage. | |||
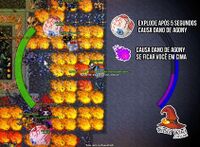
** [[Arquivo:An Eye.gif]] [[An Eye]] surgirão para atrapalhar: quando explodem, causam dano de '''Agony'''. | |||
** [[Arquivo:Agony Field.gif]] Um fogo rosa também causa dano contínuo de '''Agony'''. Como haverá muitos fire bombs na sala, sempre observe seu pé para não morrer. | |||
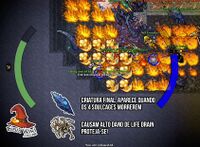
** [[Arquivo:Bonelord's Phylactery.gif]] Após destruir os 4 Soul Cages, a '''criatura final''' [[Bonelord's Phylactery]] aparecerá. Foque em eliminá-la. | |||
** [[Arquivo:Enthralled Dragon.gif]] Junto da criatura final, surgirão 4 [[Enthralled Dragon]]; equipe-se com proteção a '''[[Life Drain]]'''. | |||
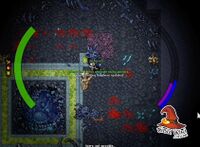
** [[Arquivo:Bone Barrier.gif]] Existe a possibilidade de o jogador ser teletransportado para um sala preso por [[Bone Barrier]]s. Caso isso aconteça, mate os [[Bone Barrier]]s para abrir caminho e utilize o teleporte para retornar à luta. | |||
<gallery mode="nolines" widths="200px" heights="200px"> | |||
Arquivo:Bone Overlord - Soulcages Sul.jpg| Scarith's e Elyrax's Soulcages | |||
Arquivo:Bone Overlord - Soulcages Norte.jpg| Myzareth's e Zharvorin's Soulcages | |||
Arquivo:Bone Overlord - An Eye.jpg| An Eye. Elyrax's Spirit longe do Elyrax's Soulcage | |||
Arquivo:Bone Overlord - Criatura Final.jpg| Criatura Final - Bonelord's Phylactery | |||
Arquivo:Bone Overlord - Bone Barriers.jpg| Sala com Bone Barriers | |||
Arquivo:Bone Overlord - Questlog.jpg| Quest log atualizado | |||
</gallery> | |||
'''Após vencer esta luta, seu questlog será atualizado'''. | |||
== No strings attached == | == No strings attached == | ||
Reporte ao NPC [[S'Zallar M'Andar]] : hi - mission - reward - yes para assim completar a missão e pegar sua recompensa | Reporte ao NPC [[S'Zallar M'Andar]] : '''hi - mission - reward - yes''' para assim completar a missão e pegar sua recompensa. | ||
{{Transcrições|npc=S'Zallar M'Andar|texto= | {{Transcrições|npc=S'Zallar M'Andar|texto= | ||
| Linha 284: | Linha 452: | ||
* Para acessar a hunt [[Outer Crypt]], basta entrar no teleport à esquerda. | * Para acessar a hunt [[Outer Crypt]], basta entrar no teleport à esquerda. | ||
* Para acessar a hunt [[Unhallowed Crypt]], utilize um [[Cryptic Fossil]]. | * Para acessar a hunt [[Unhallowed Crypt]], utilize um [[Cryptic Fossil]]. (''2 acessos'') | ||
* Para acessar a hunt [[Inner Crypt]], utilize um [[Fetid Heart]]. | * Para acessar a hunt [[Inner Crypt]], utilize um [[Fetid Heart]]. (''5 acessos'') | ||
Cada vez que entrar pelo teleporte, um acesso será consumido. | Cada vez que entrar pelo teleporte, um acesso será consumido. | ||
| Linha 313: | Linha 480: | ||
Ao completar a troca, você poderá receber um dos seguintes itens: | Ao completar a troca, você poderá receber um dos seguintes itens: | ||
{{:Trocas Crypt}} | {{:Trocas Crypt}} | ||
}} | }} | ||

Edição atual tal como às 14h49min de 26 de novembro de 2025
|
|
||||||||||||||||||||||||
| Recompensa: Acesso rápido a Draconia e hunts Outer Crypt, Inner Crypt e Unhallowed Crypt |
||||||||||||||||||||||||
| Localização: Ab'Dendriel, Ankrahmun, Draconia, Okolnir, Plains of Havoc, Thais. |
||||||||||||||||||||||||
| Você enfrentará: Walking Dread, Crypt Construct, Haunted Hunter |
||||||||||||||||||||||||
| Mini-Bosses: |
||||||||||||||||||||||||
| Bosses: Adventurer Group, Eldritch Dragon Lord, Ice Horror, The Gravedigger, Bone Overlord. |
||||||||||||||||||||||||
| Adicionado: Versão 15.20.7a5cc9 (24 de novembro de 2025) |
||||||||||||||||||||||||
|
||||||||||||||||||||||||
|
||||||||||||||||||||||||

Veja também: Quests.
Método
Requerimentos
 Key 3012 — necessária para acessar o Hellgate a caminho de Draconia.
 White Mushroom — recomendado para facilitar o retorno de Draconia.
 Jade Dragon Head — obtido durante a quest e obrigatoriamente necessário em todas as batalhas contra os bosses.
 Blood,
  The Holy Tible,
  Oil — recomendado para acesso rápido aos Dragon Lords da Pits of Inferno.
 Dwarven Ring.
Walk of Death
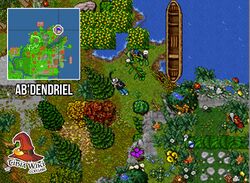
Sua jornada começa em Ab'Dendriel, com o NPC S'Zallar M'Andar, localizado em (aqui![]() ). Fale com ele dizendo: hi - unrest - yes.
). Fale com ele dizendo: hi - unrest - yes.
NPC S'Zallar M'Andar

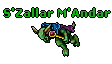 |
Jogador: Hi
S'Zallar M'Andar: Human! The ancient spirits are in unrest. |
S’Zallar M’Andar sente uma grande perturbação entre os espíritos dos dragões antigos e pede sua ajuda para investigar o cemitério dos dragões, um local sagrado onde ele não pode entrar.
|
Siga até Draconia (aqui![]() ) para descobrir a origem da inquietação. Ao chegar em Draconia, se comunique com o S’Zallar M’Andar usando o
) para descobrir a origem da inquietação. Ao chegar em Draconia, se comunique com o S’Zallar M’Andar usando o ![]() Jade Dragon Head.
Jade Dragon Head.
Chegada em Draconia

|
S'Zallar M'Andar: You arrived. Great! Now investigate the Dragon Cemetery for a hint about what is going on there.
|
S’Zallar M’Andar agradece sua chegada e instrui você a investigar o Dragon Cemetery em busca de pistas sobre o que está causando a inquietação entre os espíritos dos dragões.
Digging Deeper
Desça o buraco ao nordeste (aqui![]() ), depois continue descendo mais dois andares (aqui
), depois continue descendo mais dois andares (aqui![]() e aqui
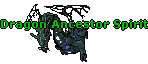
e aqui![]() ) em um caminho único até encontrar o NPC Dragon Ancestor Spirit.
) em um caminho único até encontrar o NPC Dragon Ancestor Spirit.
Buraco Dragon Ancestor
Caminho Dragon Ancestor
Dragon Ancestor


Fale hi - spirit.
 |
Jogador: Hi
Dragon Ancestor Spirit: This one knows you came here for the disturbance of the spirit world! |
Ancestor Spirit revela que os espíritos dos antigos dragões estão presos por uma força sombria que manipula a vida e a morte. Ele menciona que quatro dragões ancestrais: Myzareth, Zharvorin, Elyrax e Scarith tiveram suas almas corrompidas. Para libertá-los, você precisará buscar os locais onde cada um vinculou sua essência, interagindo com seus tesouros sagrados.
Volte até S'Zallar M'Andar em Ab'Dendriel e fale com ele dizendo: hi - mission
|
Jogador: Hi
S'Zallar M'Andar: Ah, the unscaled adventurer! I know, you are here to talk about our mission or have you lost your talisman? |
S’Zallar confirma a gravidade da situação e orienta você a se sintonizar com a energia das almas ancestrais.
Para isso, é necessário encontrar os quatro tesouros sagrados dos dragões e tocá-los enquanto estiver com o Jade Dragon Head em seu inventário.
![]()
![]()
![]()
![]()
Cada um está localizado em um teleporte verde liberado após vencer a luta de cada um dos bosses.
Clique no menu para ter mais informações abaixo.
|
|
|
|


1º - The First Dragon
- Local: Thais – Subsolo de Greenshore (aqui
 )
)
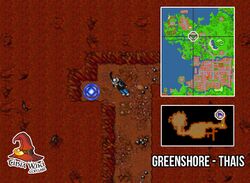
Local Adventurer Group
TP Adventurer's Group


- Requerimentos:
- Leve sua Jade Dragon Head contigo.
- Leve sua
- Proteções:
 Fire,
Fire,  Energy,
  Ice,
Ice,  Earth,
  Physical,
  Holy.
Holy. - Mecânica:
- Dentro da sala haverá um grupo de cinco criaturas, cada uma representando uma vocação:
- Quando qualquer criatura atingir a vida vermelha, ela se transformará em um Avatar da respectiva vocação, passando a causar apenas ataques críticos e sofrer menos dano.
| Sorcerer | Druid | Monk | Paladin | Knight |
|---|---|---|---|---|
Fiona Firstdream |
Grendel Greenlunch |
Nigel Neverguess |
Percy Peacetinker |
Yorik Youngbook |
| Avatar of Storm |
Avatar of Nature |
Avatar of Balance |
Avatar of Light |
Avatar of Steel |
| Atenção: Definam uma ordem para levar cada criatura ao red e transformá-la em avatar. Como os avatares aplicam golpes críticos em todos os ataques, lidar com dois ou mais ao mesmo tempo pode ser fatal. Mantendo apenas um avatar ativo por vez, a batalha se torna muito mais controlada e segura. |
Explicação

- Após derrotar todas as cinco criaturas, surgirá a criatura final: Fatal Bug
 .
. - Ao fim da luta use o teleporte verde ao sul da sala e clique na Charred Skull
 para concluir esta etapa e habilitar o reporte da missão.

Charred Skull

Report your progress
Para reportar a missão, você pode usar sua Jade Dragon Head ou reportar diretamente a missão no NPC S'Zallar M'Andar com hi - mission.
|
Jogador: Hi
S'Zallar M'Andar: Ah, the unscaled adventurer! I know, you are here to talk about our mission or have you lost your talisman? |
2º - Under Fire
- Local: Plains of Havoc - Dragon Lords Pits of Inferno (aqui)
Local Eldritch Dragon Lord
TP Eldritch Dragon Lord


- Requerimentos:
- Ter vencido a batalha do boss Adventurer Group.
- Leve sua Jade Dragon Head contigo.
- Para acesso rápido: Blood, The Holy Tible, Oil
- Proteções: Fire
- Mecânica:
 Enfrente o boss Eldritch Dragon Lord.
- Existem 4 Pulsating Lavas (vulcões) espalhados pela sala.
- A cada turno, os Pulsating Lava ganham vida, tornando-se uma Eruption e, por fim, um Flame Totem quando acumula vida suficiente.
 →
→  →
→ 
- Caso existam 3 ou mais Flame Totems ativos ao mesmo tempo, o boss se tornará imortal.
- Controle o dano no boss e mantenha ao menos 2 Pulsating Lava enfraquecidos para garantir que o boss permaneça sempre mortal.
- Aproximadamente três vezes durante a luta, ao reduzir certa quantidade de vida do boss, todos os Pulsating Lavas ganharão vida e serão transformados automaticamente em Flame Totems, independente da vida atual.
- O boss se cura com dano de fogo; como os vulcões causam dano equivalente a um exori de fogo, mantenha o boss sempre a pelo menos 2 SQMs dos vulcões.


Explicação
Eruption
Flame Totem


- Após luta do boss entre no teleporte verde e clique no Molten Throne

Molten Throne

Report your progress
Para reportar a missão, você pode usar sua ![]() Jade Dragon Head ou reportar diretamente a missão no NPC S'Zallar M'Andar com hi - mission.
Jade Dragon Head ou reportar diretamente a missão no NPC S'Zallar M'Andar com hi - mission.
|
Jogador: Hi
S'Zallar M'Andar: Ah, the unscaled adventurer! I know, you are here to talk about our mission or have you lost your talisman? |
3º - The Frozen Hoard
- Local: Svarground - Okolnir (aqui)
Local Ice Horror
TP Ice Horror


- Requerimentos:
- Ter vencido a batalha do boss Eldritch Dragon Lord.
- Leve sua Jade Dragon Head contigo.
 Fire Bombs.
- Proteções: Ice,
 Death
Death - Mecânica:
- Seu objetivo é derrotar o boss Ice Horror
 .
. - Para chegar até ele, será necessário atravessar duas barreiras de Ice Blockades.
- Para destruir um Ice Blockade, posicione-se próximo e aguarde um alvo aparecer perto da barreira.
- O dano do alvo destruirá o Ice Blockade.
- Quando o alvo surgir, saia imediatamente de cima: a explosão criará um buraco que causa root e o efeito de congelado se o jogador estiver sobre ele.
- Após remover ambas as barreiras, recomenda-se que o time se posicione em um canto da sala.
- O boss possui alta resiliência no início da luta.
- Além do seu dano, os próprios alvos também causam dano no boss.
- Utilize Fire Bombs nos pés para evitar o efeito de Fear.
- Ao atingir certa quantidade de vida, o boss fará surgir uma invasão de Ice Crawlers. Sobreviva por alguns segundos até que os alvos e seus danos as eliminem, deixando a batalha mais tranquila.
- Seu objetivo é derrotar o boss Ice Horror

Mecânica Alvo - Escorregar - Drunk
Alvo destruindo Ice Blockade
Root ao pisar no piso destruído
Segunda barreira
Posicionamento do time
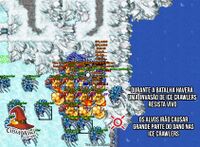
Invasão Ice Crawlers


- Após luta do boss entre no teleporte verde e clique no Draconic Rattle


Draconic Rattle

Report your progress
Para reportar a missão, você pode usar sua ![]() Jade Dragon Head ou reportar diretamente a missão no NPC S'Zallar M'Andar com hi - mission.
Jade Dragon Head ou reportar diretamente a missão no NPC S'Zallar M'Andar com hi - mission.
|
Jogador: Hi
S'Zallar M'Andar: Ah, the unscaled adventurer! I know, you are here to talk about our mission or have you lost your talisman? |
4º - The Last Dragon Soul
- Local: Ankrahmun - Esquerda Terramite (aqui)
Local The Gravedigger
TP The Gravedigger


- Requerimentos:
- Ter vencido a batalha do boss Ice Horror.
- Leve sua Jade Dragon Head contigo.
- Dwarven Ring.
- Proteções: Death
- Mecânica:
- Seu objetivo é derrotar o boss The Gravedigger
 .
. - O chão da sala faz o jogador andar devagar.
- Durante a luta, haverão ondas que surgem do norte para o sul e da esquerda para a direita.
- Caso o jogador atravesse uma onda, ele receberá +1 carga (ou mais, dependendo do tempo que permanecer dentro dela).
- Se o jogador atingir 21 cargas, será morto instantaneamente.
- Se o boss passar por uma onda, ele também ganhará cargas, tornando-se mais forte e resistente.
- Para evitar o aumento das cargas (tanto no jogador quanto no boss), é necessário passar pelos vãos entre as ondas.
- Há totens espalhados pela sala que dificultam a movimentação além disso eles causam drunk, portanto recomenda-se o uso de Dwarven Ring.
- A comunicação do time é essencial para coordenar desvios e finalizar o boss com segurança.
- Seu objetivo é derrotar o boss The Gravedigger

Explicação

- Após luta do boss entre no teleporte verde e clique no Gilded Wig

Gilded Wig

Report your progress
Para reportar a missão, você pode usar sua ![]() Jade Dragon Head ou reportar diretamente a missão no NPC S'Zallar M'Andar com hi - mission.
Jade Dragon Head ou reportar diretamente a missão no NPC S'Zallar M'Andar com hi - mission.
|
Jogador: Hi
S'Zallar M'Andar: Ah, the unscaled adventurer! I know, you are here to talk about our mission or have you lost your talisman? |
The Graveborn's Puppeteer
Após matar os 4 bosses retorne até o NPC S'Zallar M'Andar e solicite a nova missão dizendo: hi - mission.
|
Jogador: Hi
S'Zallar M'Andar: Ah, the unscaled adventurer! I know, you are here to talk about our mission or have you lost your talisman? |
A partir deste momento, o NPC S'Zallar M'Andar oferecerá uma passagem direta para Draconia.
Fale: hi - passage - yes
|
Jogador: Hi
S'Zallar M'Andar: Ah, the unscaled adventurer! I know, you are here to talk about our mission or have you lost your talisman? |
Antes de prosseguir, confirme se sua missão foi atualizada no questlog.
Você também ganhou acesso às hunts: para entrar na Outer Crypt, utilize o teleporte à esquerda logo após o NPC Dragon Ancestor Spirit.
Dragon Ancestor
Agora chegou o momento de enfrentar o boss final, o Bone Overlord, localizado em Outer Crypt (aqui![]() ).
).
- Local: Sudeste Outer Crypt (aqui)
Bone Overlord TP
Alavanca Bone Overlord


- Requerimentos:
- Ter vencido os quatro bosses anteriores: Adventurer Group, Eldritch Dragon Lord, Ice Horror, The Gravedigger.
- Fire Bomb.
- Proteções: Physical, Death , Ice, Energy,
 Life Drain.
 - Mecânica:
- Haverão 4 Soul Cages (Pilares) na sala, além de 4 Dragões, cada um correspondendo ao pilar de mesmo nome.
- Seu objetivo inicial é destruir os 4 Soul Cages. Ao destruir um pilar, o dragão correspondente também morrerá.
- Jogue Fire Bomb no chão, pois os dragões aplicam Fear.
- Cada Soul Cage possui uma fraqueza específica:
 Zharvorin's Soulcage (norte direita): Death
 Elyrax's Soulcage (sul direita): Death
 Scarith's Soulcage (sul esquerda): Ice
 Myzareth's Soulcage (norte esquerda): Energy
 Não permita que o dragão (Spirit) de mesmo nome fique próximo ao seu Soul Cage, pois ele irá recuperar vida do soulcage.
 An Eye surgirão para atrapalhar: quando explodem, causam dano de Agony.
 Um fogo rosa também causa dano contínuo de Agony. Como haverá muitos fire bombs na sala, sempre observe seu pé para não morrer.
 Após destruir os 4 Soul Cages, a criatura final Bonelord's Phylactery aparecerá. Foque em eliminá-la.
 Junto da criatura final, surgirão 4 Enthralled Dragon; equipe-se com proteção a Life Drain.
 Existe a possibilidade de o jogador ser teletransportado para um sala preso por Bone Barriers. Caso isso aconteça, mate os Bone Barriers para abrir caminho e utilize o teleporte para retornar à luta.


Scarith's e Elyrax's Soulcages

Myzareth's e Zharvorin's Soulcages
An Eye. Elyrax's Spirit longe do Elyrax's Soulcage
Criatura Final - Bonelord's Phylactery
Sala com Bone Barriers
Quest log atualizado


Após vencer esta luta, seu questlog será atualizado.
No strings attached
Reporte ao NPC S'Zallar M'Andar : hi - mission - reward - yes para assim completar a missão e pegar sua recompensa.
|
Jogador: Hi
S'Zallar M'Andar: Ah, the unscaled adventurer! I know, you are here to talk about our mission or have you lost your talisman? |
| Recompensa: 1 Crypt Rune, entre Fiery Crypt Rune Icy Crypt Rune Deathly Crypt Rune Ancient Crypt Rune Necromantic Crypt Rune
|
Utilidades
Acesso às hunts
O acesso às hunts é garantido após derrotar o quarto boss, o The Gravedigger, durante a missão The Last Dragon Soul.
- Para acessar a hunt Outer Crypt, basta entrar no teleport à esquerda.
- Para acessar a hunt Unhallowed Crypt, utilize um Cryptic Fossil. (2 acessos)
- Para acessar a hunt Inner Crypt, utilize um Fetid Heart. (5 acessos)
Cada vez que entrar pelo teleporte, um acesso será consumido.
Forjando Armas Crypt
Para forjar armas Crypt, você precisa reunir os 5 tipos diferentes de Crypt Runes:
Após reunir todas, siga até o NPC Dragon Ancestor Spirit em Dracônia e diga: hi - trade - yes.
|
Jogador: Hi
Dragon Ancestor Spirit: I am aware of what brings you here. So let us trade, mortal. |
Ao completar a troca, você poderá receber um dos seguintes itens:
| Arma | Quantidade | % |
|---|---|---|
| 82 | 15.8% | |
| 79 | 15.3% | |
| 76 | 14.7% | |
| 75 | 14.5% | |
| 73 | 14.1% | |
| 69 | 13.3% | |
| 64 | 12.4% |